I Built a Tool, Used It Twice, Then Forgot How
The featured image pipeline worked perfectly. I'd built a script that calls an AI image API, a compositing script that merges text and illustrations, and a CSV-driven system that produces branded blog images in minutes.
The first time I used it, I'd just finished building it. Every step was fresh. Generate image, add hook text to CSV, run the composite script, copy to the blog, push to production. Clean, fast, satisfying.
The second time, a few days later, it still worked. I remembered the sequence. No problems.
The third time, two weeks had passed. I sat down to create an image for a new blog post and immediately got stuck. Which script do I run first? What's the CSV format — is the slug first or the hook text? What folder do the source images go in? Where's the output? What's the exact copy command to deploy?
I had a capable tool and no idea how to use it. Everything I needed was in my head two weeks ago, and now it was gone.
This is the most common failure mode for any tool, automation, or process that a founder builds: it works when you remember it, and it dies when you don't.
What a Good Workflow Document Looks Like
A workflow document is not a README. READMEs explain what a project is and how to install it. They're written for strangers.
A workflow document is not a tutorial. Tutorials teach concepts. They include background, explanation, and context. They're written for learners.
A workflow document is a step-by-step playbook for your future self. It assumes you already understand the system. It tells you what to do, in order, with exact commands. It's written for someone who knows the "why" but has forgotten the "how."
Here's what my WORKFLOW.md looks like for the featured image pipeline:
Step 1: Generate the Illustration
node generate-image.js "PROMPT" "public/blog/images/SLUG.png"
Standard prompt prefix (copy this every time):
Wide landscape editorial illustration. Plain flat warm cream background.
Illustration on RIGHT 55 percent. LEFT 40 percent empty cream.
NO TEXT. NO LETTERS. NO SYMBOLS.
Thick black outlines. Bold flat fills.
ONLY orange, terracotta, peach, cream, black. ZERO cool colors.
Step 2: Add Hook Text to CSV
Edit featured-image-data.csv and add a new row:
slug,"Hook line 1.","Hook line 2 (italic orange).","slug.png"
Step 3: Composite Text + Image
node composite-featured.js
Step 4: Deploy to Blog
cp out/featured/kaiak-SLUG.webp "/path/to/blog/public/blog/headers/"
Step 5: Push to Production
git add -A && git commit -m "Add featured image for SLUG" && git push
That's the whole document's operational section. Five numbered steps. Each step has the exact command to run or the exact file to edit, with the exact format to follow. No explanation of why the script works. No description of how the compositing algorithm functions. Just: do this, then this, then this.
The total time to follow these five steps is under 10 minutes. The total time to figure out these five steps without the document is 30 minutes of digging through files, checking old terminal history, and re-reading script source code.
The Design Specs Section: Locking Your Decisions
Below the steps, my WORKFLOW.md has a design specifications section:
| Specification | Value |
|---|---|
| Canvas | 1280 x 720px (16:9) |
| Background | #F5F0E8 (warm cream) |
| Text zone | Left 55% (704px) |
| Image zone | Right 45% (576px) |
| Font | Playfair Display, 72px, weight 900 |
| Text colour (line 1) | #0F172A (navy) |
| Text colour (line 2) | #EA580C (orange, italic) |
| Left padding | 64px |
| Export format | WebP, 85% quality |
| File naming | kaiak-[slug].webp |
These are locked decisions. They don't change per image. They were decided once, during the design phase, and they apply to every image the system produces.
The document also lists what's swappable:
| Per Image | How to Change |
|---|---|
| Illustration | New prompt in Step 1 |
| Hook text (line 1) | New row in CSV |
| Hook text (line 2) | New row in CSV |
| Slug | New row in CSV |
This "lock vs. swap" distinction is the key to sustainable systems. Locked decisions never need to be re-made. They're in the document, they're in the script, they're settled. Swappable elements change with each use and the document shows exactly where and how to change them.
Without this distinction, every use of the system involves implicit decisions about canvas size, font choice, colour values, and export format. Those decisions feel trivial in the moment but they're the reason your outputs slowly drift into inconsistency.
BRANDING.md, WORKFLOW.md, and the Brief: A Three-Document System
Over the course of building the KAIAK content pipeline, three documents emerged that, together, form a complete operating system for any creative process:
1. BRANDING.md — How Things Should Look
The brand guide defines the visual rules. Colours, typography, animation timing, what to use, what to avoid. It answers the question: "Does this look like KAIAK?"
My BRANDING.md is 65KB. It covers colours, fonts, animation presets, composition rules, logo guidelines, and explicit lists of what never to use. It's the reference document that ensures visual consistency across everything — blog images, videos, website design, social media.
2. WORKFLOW.md — What to Do
The workflow document defines the steps. Run this, edit that, deploy here. It answers the question: "How do I produce the next piece of content?"
It's deliberately not explanatory. It's a checklist. If you know the system, the workflow document is all you need to execute.
3. The Brief — Why and What (for Collaborators)
The brief provides context, templates, and constraints for anyone producing content — including AI. My FEATURED-IMAGE-BRIEF.md contains ChatGPT-ready prompts, visual style guidelines, and examples. It answers the question: "What am I trying to produce, and what are the constraints?"
When I hand a task to Claude Code, it reads all three. The brief tells it what to make, the brand guide tells it how it should look, and the workflow tells it where things go. The AI can produce on-brand work without supervision because the three documents cover every question it might have.
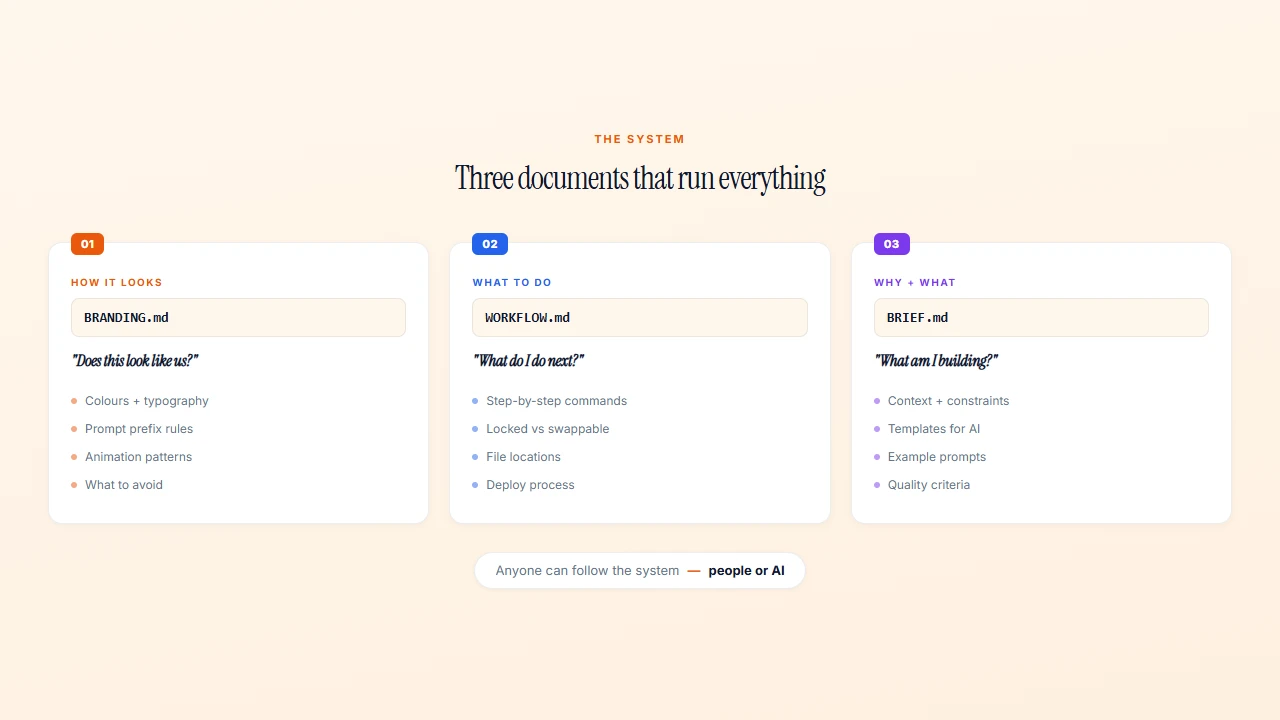 The three-document system: BRANDING.md, WORKFLOW.md, and BRIEF.md — each answers a different question
The System Works for People Too
These three documents aren't just for AI. If I hired a designer, a virtual assistant, or a freelancer, these documents would let them produce on-brand work from day one. No training session. No "let me show you how we do things." Just: read these three files, follow the steps, check the brand guide.
That's what documentation does. It turns individual knowledge into organisational capability.
Making This Work for Your Organisation
Every recurring process in your organisation should have a workflow document. Not a policy document. Not a guidebook. A step-by-step playbook.
Annual report production. Step 1: pull data from these three sources. Step 2: populate this template. Step 3: review with these people. Step 4: submit by this date. Locked: the template, the data sources, the review process. Swappable: the data, the year, the reviewers.
Board meeting prep. Step 1: request updates from team leads by this date. Step 2: compile into this template. Step 3: generate data visualisations from this dashboard. Step 4: send agenda by this date. The template is locked. The content swaps.
Staff onboarding. Step 1: create accounts in these systems. Step 2: send this welcome email (template attached). Step 3: schedule these three meetings. Step 4: share this folder of key documents. Every new hire gets the same experience because the steps are written down.
Event planning. Step 1: book venue by this date. Step 2: send invitations using this template. Step 3: order supplies from this vendor list. Step 4: run through this day-of checklist.
The format is the same in every case: numbered steps, exact tools, exact formats, what's locked and what's swapped.
The Cost of Not Writing It Down
The workflow document took me 30 minutes to write. It's saved me at least 30 minutes every time I use the pipeline — which is now dozens of times.
But the real cost of not writing it down isn't time. It's abandonment. Tools without documentation get used twice and forgotten. Processes without documentation exist only in one person's head, and when that person leaves (or just forgets), the process dies.
The featured image pipeline is a good tool. The workflow document is what makes it a system — something that works reliably, regardless of how long it's been since I last used it, and regardless of whether I'm the one using it.
Write the steps. Lock the decisions. Your future self — and your team — will thank you.
Want someone to build these workflow documents and systems alongside you? My AI Systems Implementation programme turns your processes into documented, repeatable systems in 6 weeks.